
If you take life too seriously, then it will treat you seriously.
Much of this information is currently under review - just to be sure I am up to speed with current techniques etc.
Hints and ideas to make life easier... or more complicated
Contents:
- Workflow
- Meta-Data
- Archiving
- Photoshop
- Colour Balance
- The Orton Effect
- The Lomo Effect
- Othe PhotoShop Links
WorkFlow
From time to time I come across articles about "workflow". What workflow is all about - is essentially, the order in which you do things. We all have workflow. We get up in the morning, feed the cat, put coffee on and check the weather channel, the state of the world etc...
When you do photography, you have workflow. Depending on what kind of photography you do - the workflow can vary. I could picture the most amateur photographer in the days of film having a workflow that went like this:
In the digital realm, you can view the pictures on the camera, so the workflow may stall at "snap photos". I say stall because this should never be the end of your workflow. I've discussed this in the past - the idea of downloading regularly, backing up regularly and so on. There's more to it however. Much more.
Like that shoebox full of photos, your digital files now residing on your computer (and properly backed up on DVD somewhere) are just files. They have random
names such as MG_4396.jpg, or DSC_3411.jpg. So how do you deduce from this file name that these pictures are from Bob and Sherry's 10th anniversary dinner?
Most operating systems can give you some kind of preview thumbnail of the picture, however, these pictures are stored in folders (or directories or whatever we call them now) which are typically coded with a date. Then, five years down the road, you have to remember the date of the party... some photos I took three years ago seem like I took them yesterday. Without a proper storage philosophy I would spend hours looking for one shot.
Where am I going with all of this - workflow. As I said, we all have our own. I will describe mine. I actually wrote it down because I don't always follow it, particularly if I think I just finally captured that money-shot and need to see it on the big screen right away. It's a workflow I try to follow.
The points listed above focus on getting the photos from the camera to the computer, identifying them, backing them up, and making your camera ready for the time you need it. There are other things I do along the way - that makes file access easier for me, but these are my own preferences and not typically something everyone might do, or think worth doing. The essentials are listed above. As I said - I try to follow this procedure. If I'm on an extended trip, I may make temporary backups to my tablet, or a card-reader/hard-drive unit (more about this can be found blog pages).
My complete workflow is actually quite a bit more extensive than this in reality, but these are the steps that pertain to everyone - no matter how serious a photographer you are. The steps you follow within your photo-editing software are another matter, but the truth is, no everyone works with their photos in the same manner nor to the same extent.
From time to time I come across articles about "workflow". What workflow is all about - is essentially, the order in which you do things. We all have workflow. We get up in the morning, feed the cat, put coffee on and check the weather channel, the state of the world etc...
When you do photography, you have workflow. Depending on what kind of photography you do - the workflow can vary. I could picture the most amateur photographer in the days of film having a workflow that went like this:
- remember to take camera
- snap photos
- when film is finished change the film (depending on how often you took snapshots, try to remember how to change the film).
- The next steps are variable - if you are in a hurry to see the pictures, you take the film in, if not, then remember to take the film in.
- remember to pick up the photos.
- enjoy
In the digital realm, you can view the pictures on the camera, so the workflow may stall at "snap photos". I say stall because this should never be the end of your workflow. I've discussed this in the past - the idea of downloading regularly, backing up regularly and so on. There's more to it however. Much more.
Like that shoebox full of photos, your digital files now residing on your computer (and properly backed up on DVD somewhere) are just files. They have random
names such as MG_4396.jpg, or DSC_3411.jpg. So how do you deduce from this file name that these pictures are from Bob and Sherry's 10th anniversary dinner?
Most operating systems can give you some kind of preview thumbnail of the picture, however, these pictures are stored in folders (or directories or whatever we call them now) which are typically coded with a date. Then, five years down the road, you have to remember the date of the party... some photos I took three years ago seem like I took them yesterday. Without a proper storage philosophy I would spend hours looking for one shot.
Where am I going with all of this - workflow. As I said, we all have our own. I will describe mine. I actually wrote it down because I don't always follow it, particularly if I think I just finally captured that money-shot and need to see it on the big screen right away. It's a workflow I try to follow.
- Always take my camera (and usually kick myself if I don't).
- set camera settings to the situation
- compose the shot
- make the photo....ok, ok I'm getting there...
- Once I get home, I download the photos onto my computer.
- Imediately label the folder - Date first, then subject
- Rename all the files, essentially the same way: original filename, then subject. (there are a few free file-renaming utilities out there if you search around. These definitely beat renaming 400+ individual files) Adobe Bridge can do it too - I use this all the time at work.
- After this is done and I've searched through the pictures for my 'money-shots' I go in and modify the 'meta-data' of the files.
- Since I almost always use my camera's RAW file format, I will then create a separate folder and convert all (or all the good shots) into jpg files - which I copy over to the home network for the rest of the family to be able to access.
- I immediately back up all my files to an external hard drive. IMMEDIATELY!!! I can't stress this enough.
- Then I can erase the files on my camera's card.
- When my Pictures folder reaches about 20GB or so, I will copy all the files to a blueray disk as a permanent backup, and then delete whatever
files I don't need from my computer's drive.
The points listed above focus on getting the photos from the camera to the computer, identifying them, backing them up, and making your camera ready for the time you need it. There are other things I do along the way - that makes file access easier for me, but these are my own preferences and not typically something everyone might do, or think worth doing. The essentials are listed above. As I said - I try to follow this procedure. If I'm on an extended trip, I may make temporary backups to my tablet, or a card-reader/hard-drive unit (more about this can be found blog pages).
My complete workflow is actually quite a bit more extensive than this in reality, but these are the steps that pertain to everyone - no matter how serious a photographer you are. The steps you follow within your photo-editing software are another matter, but the truth is, no everyone works with their photos in the same manner nor to the same extent.
Meta-Data
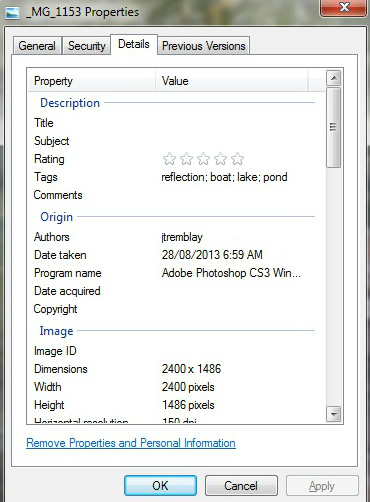
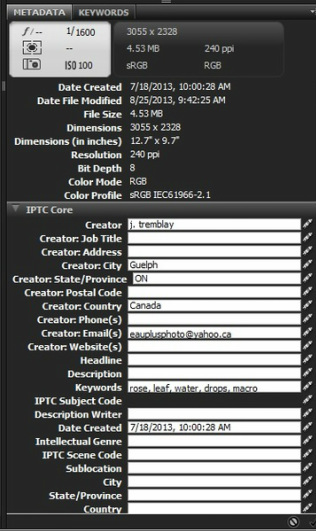
I spoke previously of modifying the Meta-Data of your photo files as well as renaming them so you could find them easier later. Meta data is basically a whole lot of information that is encoded into the electronic file in a standard format, which includes the creator's name and address, copyright info and keyword tags which make searching easier. You can find all kinds of information on meta-data here:
http://www.photometadata.org/META-101
Suffice it to say that with this feature you can make searching your files much easier - particularly with the keywords.
http://www.photometadata.org/META-101
Suffice it to say that with this feature you can make searching your files much easier - particularly with the keywords.
|
|
For instance, my photo of a barn owl will contain keywords such as owl, barn owl, bird and so on. If I need to find a cool picture of a bird regardless of what kind, I can search by this keyword and the search will include this picture. If someone else wants to know who created this brilliant piece of work, they can find this information in the meta-data. Adobe bridge allows you to modify the metadata of each file, and I know that via Windows you have access to change some of this information too. Most cameras allow you to preset the data and embed it as the photos are created - so in this case, the information is already in the file as you are downloading it to your computer. The specifics of this can be found most often either in your user's manual or by searching the Internet for the specifics of your camera setup.
Another advantage of meta-data is that you can embed copyright information into the file as well.
However, keep in mind, as mentioned in the blog article, that some social media sites strip ALL metadata from the files you post. I believe that standard copy and paste functions do not copy this data either.
http://www.bjp-online.com/british-journal-of-photography/news/2254536/study-exposes-social-media-sites-that-delete-photographs-metadata
IF you are posting something and you DO care about where it's used, then there are other ways to identify your photos (called watermarking). I've spoken about this before too, and promised to post something about how to watermark your photos. Right now I'm doing research on a how to do this with programs other than photoshop. Stay tuned for that info.
Not just photographs - our Legacies
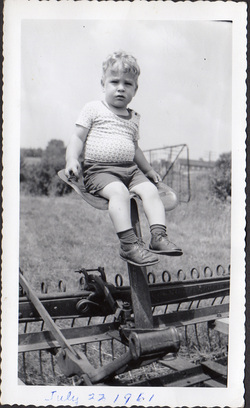
For those of us who grew up in the era of film, there are shoeboxes stored in closets with photos of our vacations, holidays and memories. Sure, the storage means was not the optimum. There is lots to be desired of the humidity or heat which fades the colours and wrecks the negatives. Modern technology means however, can restore some of the original life to these images. Only the house burning down could obliterate these records of our past.
Now - we have digital. View the pictures on the screen - they never fade. But the shoebox is gone. We who are photographers with a passion for the craft have backups (you do have backups don't you?). I personally have over a hundred DVDs with my photos backed up. These are my craft as well as my memories. They also include a record of every negative I could find - scanned carefully. There are also a couple of home movies scanned and burned to DVD.
The danger is - for those who are not so familiar with the delicateness of the technology. I've heard horror stories of hard disks crashing, and obliterating all files on them. I've heard stories of people who've never downloaded files off their camera's memory card. Quality and composition and perfection aside - these photographs hold cherished memories. They are held delicately in an electronic circuit (or worse magnetic media) which, subject to an unexpected static zap, is potentially lost forever.
If you know someone who is guilty of not backing up their files, encourage them any way you can. I've gone so far as to create backups for individuals. Back up files! The days of leafing through a photo album you stumbled across in the back of your closet, and having all those great memories come rushing back are at risk. There was nothing so emotional as when I had to go through photos shortly after my dad passed away. I can't imagine if these photos had been stored away on a crashed hard disk, or an unreadable memory card. Back up files and encourage everyone you know to do so.
Related: if you have ever had a VCR eat a tape on you... get those old home videos (and - if you are that old, those "Super 8" films) transferred to DVD. They are just as valuable a record of our times as a photograph.
Photoshop Stuff
It's more environmentally friendly than chemicals (I think). Ansel Adams was quoted as saying that if the negative was the musical score, the print would be the performance. When he said this, negatives were the product of the camera, and the print was the product of the darkroom. In the digital photo age, what is captured in the camera is not yet complete without proper processing in the (digital) darkroom. It therefore is to our advantage to learn all we can about the digital darkroom. While Photoshop is most referenced here, most photo editing software provides the same kinds of functionality. I have not done much with Lightroom, although, I hear it is a wonderful piece of software, and very affordable. I just happen to use photoshop at work, and therefore know more about the use of this software.
Colour Balance - getting it right.
It is strongly recommended that you get a monitor calibration tool if you are going to try to do stuff somewhat seriously. There are some pretty good ones out there. I have an inexpensive "Huey" from Pantone. It works. Probably not exactly what I wanted but still - it makes a huge difference compared to what the standard monitor colour would give me. Eventually Iwill get a better calibrator but for now... not so bad.
But what if you are photographing people and you still can't seem to get those skin tones right, or you just aren't sure. Well, check out David Riecks' website. He has a chart (along with instructions) which can help you greatly in getting those skintones just right. You will find it at: http://www.riecks.com/digitalinfo.html. All the info is there in the "Digizone" chart and the skintone calculator. Enjoy.
But what if you are photographing people and you still can't seem to get those skin tones right, or you just aren't sure. Well, check out David Riecks' website. He has a chart (along with instructions) which can help you greatly in getting those skintones just right. You will find it at: http://www.riecks.com/digitalinfo.html. All the info is there in the "Digizone" chart and the skintone calculator. Enjoy.
The Orton effect.
You can read up on this effect, and it’s creator on the internet. There are lots of site which give examples of this. The simple way to do this in photoshop, if you only have a single exposure is using layers.
Here’s how:
I typically make three copies of the background, naming one layer “sharp”, the middle layer called “sharper” and the uppermost layer “soft”. Start by turning the top (“soft” ) layer off. Set the blending more of the “sharper” layer to SCREEN. This makes the resultant image look much brighter. Merge the “sharp” and “sharper” layers into a single layer.
Next, turn on the top “soft” layer. Add some Gaussian blur to the picture (the amount you add depends on the number of pixels you have). The more pixels, the more blur you need to apply. Now change the blending mode of this layer to Multiply.
That’s about it. I have also tried things like increasing the saturation on one layer and lowering it on the other… interesting effects. Particularly – try no saturation on the sharp layer and lost of saturation on the soft layer.
If you get real adventurous, consider doing this at capture time. Do two pics, one over exposed and sharp, and one normal (or a bit under) and slightly out of focus. Then combine them in photoshop using layers.
Have fun.
The Lomo Effect
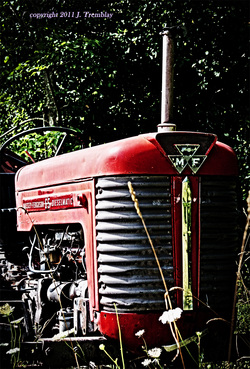
As per one of the links below, the Lomo effect is essentially a way of creating the same effect in photoshop as we would have if we developed slide film with the regular C41 process (and, if you want to split hairs, used the Lomo camera to make the photo).
The first step is to create the vignette around the outer corners of the shot. Thie can be accomplished in a number of ways, though I usually like to use "burn" and darken the edges to suit my taste. A tablet comes in real handy for this. (note: this is probably the one feature that is specific to the "Lomo" type camera, in that it did not expose properly around the outer edges of the shot. Never having owned one, but having dealt with numbers of other cheap cameras... this is my take on it).
The next step is (on a separate layer) to use the curves adjustment and crank up the contrast by increasing the lighter tones, and dropping the darker tones. The curve should look like lazy "S" when you're done.
Next, create a new layer on top and fill it with black. Change the blending mode to "hue" and set opacity to 40%.
Now, flatten the image (make sure to save it as a different file name), and change the colour mode to LAB. In the layers panel, select the lightness layer only, and apply an unsharp mask (fairlly severe sharpening) to this layer.
Set the colour mode back to RGB and that's it.
If you want more detailed explanation, have a look at this site: http://www.digital-photography-school.com/how-to-make-digital-photos-look-like-lomo-photography . They do a better step-by-step explanation. It's an interesting effect, not for everything, but perhaps if you're at an antique car show, of findinge some old artifacts or... just looking to experiment with photoshop, it's fun.
Other photoshop tutorial pages you might find interesting:
Vandelay Design
and
Hongkiat
These sites have links to tutorials that allow you do do some traditional and not-so-traditional things in your digital darkroom.
Vandelay Design
and
Hongkiat
These sites have links to tutorials that allow you do do some traditional and not-so-traditional things in your digital darkroom.
