"learn to see and then you'll know that there is no end to the new worlds for our vision"
C. Castaneda
C. Castaneda
Contents
- Capturing fireworks
- Dealing with Thermal issues
- Make your own scrim
- Indoor Photos
- Rules of Thumb
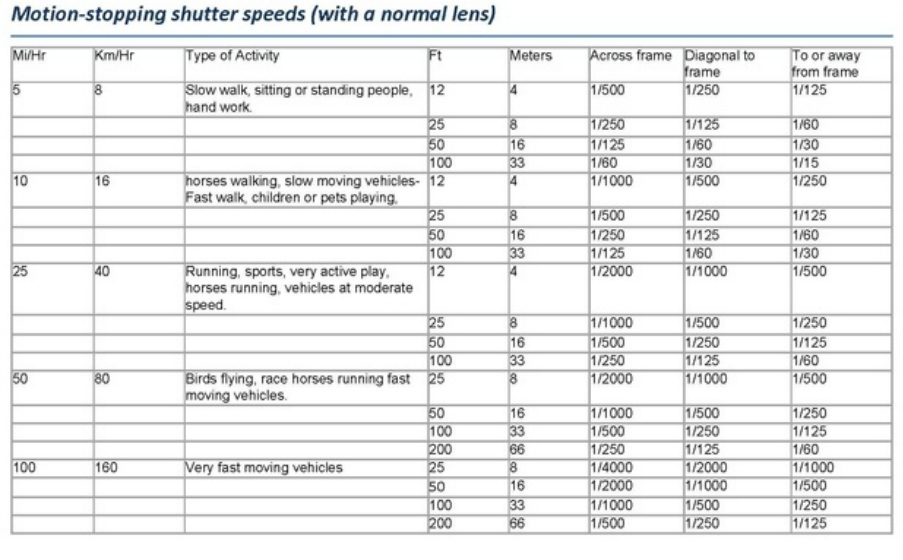
How to Capture Fireworks:
Sorting through some files, I came across this bit of wisdom I put together some time ago about capturing fireworks. These are just some tips if you want to capture fireworks:
Basically, what we will do is use extremely long exposure and let the light from the fireworks expose the picture. This is quite a bit like writing with light (another article). You will leave the shutter open for an extended time.
1. Use an ISO setting of 100 or 200 or so for the least noise.
2. Typically I use an aperture of f/8 or f/11 but you should experiment with this. Note: this is the setting which will ultimately determine the proper exposure, since you are leaving the shutter open.
3. You’ll need a tripod. The camera will need to be steady. Ideally a remote release works well too (cable or remote
control).
4. If you have a bulb setting (keeps the shutter open for as long as you have the button pressed), this is what you should use. I like to actually use a 15 second or 30 second shutter speed during the ‘fury’ of the fireworks show. Again – experiment. Longer exposures will tend to include the surroundings as well as the fireworks themselves.
5. Fireworks over a lake or body of water are really cool – the reflections add to the visual.
6. If you have editing software that allows it, you can take multiple exposures of the fireworks show and combine them.
As I mentioned, or alluded to in the series on “Mind-Aperture”,when I watch fireworks – what I see is amazing colours and light. Typically, these colours get lost in a digital image, so I typically turn up the saturation in my photo-editing software until what I see in the picture is what I remember.
Prepare to take lots of pictures. And don’t forget to enjoy – because what you won’t capture is the sounds.

multiple shots combined, saturation increased slightly
Catching the Thermals
I wouldn't have thought it, but temperature does make a noticable difference. The articles always tell you to keep your batteries in your pocket and let your gear stabilize indoors to prevent condensation. I found out the problems with temperature this morning first-hand.
The ever-popular backyard birdfeeder, and early morning temperatures. Who woulda thought? I set up my camera as usual because I wanted to get a photo of Mr. Cardinal's pretty lady. I set up the lens (manual, 500mm reflector-type, cheap but worth a try), the tripod and the remote inside the house then set it outside in a convenient location that doesn't spook the already-shy cardinals. I focused it carefully, set the exposure, made sure the remote was working, and then went back inside to enjoy my coffee (lazy huh?).
Soon enough, they returned. I snapped happily until my cat, sitting on my lap noticed the birds. That was the end of that episode. So I decided to go get my card, maybe change lenses and get more adventurous with a wider view or something like that. I changed to an autofocus lens, and sat back down to "develop" my first roll and wait for the birds again.
The lens I had used had no auto-focus. No problem though - as I had set the focus carefully prior to leaving it there. However, the near freezing temperature, and the time I waited actually affected the focusing of the lens to the point where my shots were wasted. Note - that the exposure changed - this is not actually an equipment thing... the day got brighter. Manual exposure was used here too. The photo on the right shows what can happen if you don't account for temperature stabilization.
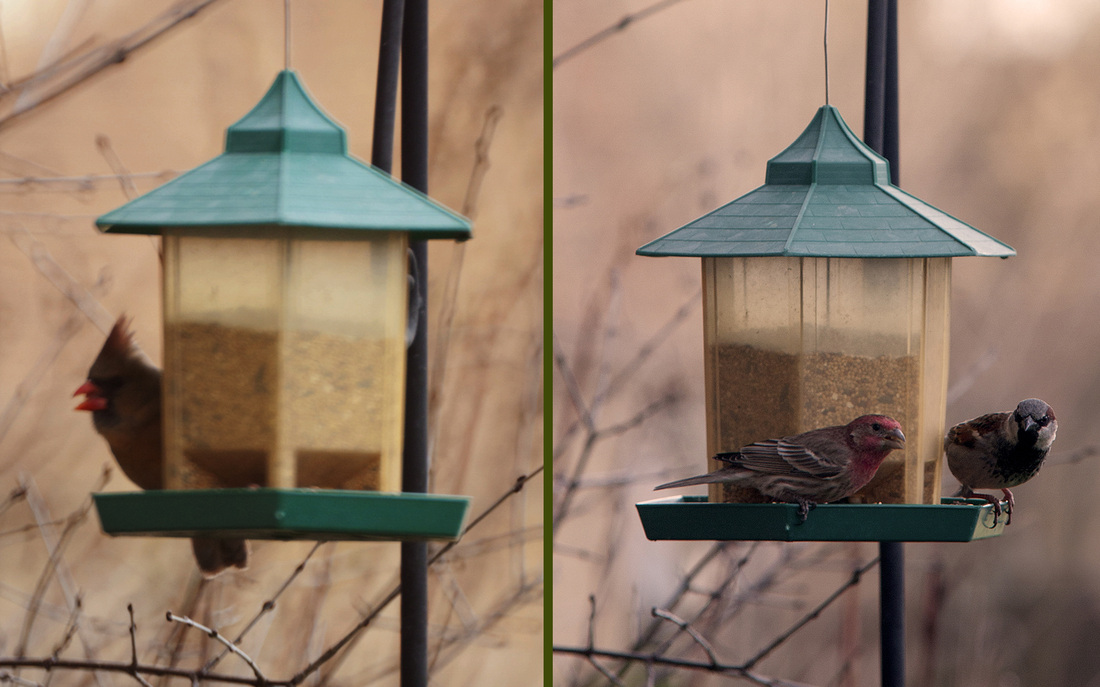
I never did get a suitable photo of the female cardinal, i did get some nice photos however. Lesson learned - let your gear stabilize. Focus is just one thing (obviously one of the more important), but in general, the temperature can
indeed have an effect and possibly render your pictures un-usable.
Make your own Scrim
Scrim... Diffusion Screen... I'm not sure what they are called this week. We used "scrims" in the studio at school for a couple of purposes, but primarily for making a point light source larger. Diffusing the light from a point source, making it softer lighting. In a pinch, we also used them to reflect light, but they aren't perfect - as they are designed to let light through.
I decided, based on what I saw, that it couldn't be that difficult to make my own. I got some nice translucent white material, made some wooden frames, got out my staple gun... bam! I had scrims. 2 of them. Big-assed scrims. I used them to shoot one project... and realized there were some limitations to these devices. The frames were large. It made them difficult to support. They were rather heavy. And when I was done, I had no place to store them.
This idea came to me in part when I saw a roadside banner, and also in part while attending a broadcast tradeshow. I realized I could make something that could be disassembled easily and stored in much smaller space than those gigantic wooden frames. It's quite easy. I took my frames, and cut the cloth from them. I got some iron-on material that you use to hem your pants. This stuff sticks material to itself (I don't have a sewing machine to hem the material). Around the edge of the material I hemmed in some parachute-cord (hoping that the edges might be stronger that way). Then I installed do-it-yourself grommets evenly spaced around the edge of the cloth.
Next I purchased a length of 1/2" copper pipe and some 90 degree elbows. I cut the pipe and soldered 2 elbows on two of the four pipes (see the first picture). This now allows me to quickly put together a frame for the cloth to be stretched out on. Lastly, I used some "Replacement Shock-Cord" (the stuff that is used in tent poles - you can buy replacement rolls at any camping supply store, along with the grommets) to hold the cloth over the frame. This is really all you need, since the shock cord (it's like mini bungee cord) allows the frame to be disassembled without untying it. As well, the shock cord and cloth act to hold the frame together. It can all be disassembled quickly and takes up about the same space as a tripod.
Some notes and cautions:
1. Don't put the material too close to a hot light source. If it doesn't catch fire, it will surely discolour the material. Either scenario is unpleasant.
2. Keep in mind that different colour material can be used here - not just white. Even patterned material can be used for cool effects. This will be my next experiment. The tradeshow part of the idea was a large green-screen for video use.
3. If all you want is white - shop around - sometimes there are deals floating around on those pop-up reflectors which also have a 'mode' in which they can be used as a diffusion screen. The cost of these versus the effort in doing a scrim like this can be close.


Indoor Photos
The challenge of pictures indoors is always a tough one. Once you have decided on your vision – you know what it is that you want to portray, the next step is how to get there.
We all remember the warmth of the evenings at home, the golden yellow colour of the lights and/or fireplace. Do we colour balance for this? Or do we let the image sensor and resultant photograph show us something overly rich in warm tones. The quality of the light here affects the mood of the picture.
Often times, lighting levels are very low. How do we get respectable shutter speeds that prevent blur. Or do we consider that some of what we are showing is interaction between people and there is natural motion and thus motion blur. Does this bring the viewer into the scene and into the action of the scene. Or – do we actually want to freeze the action? Can you bounce a flash off the ceiling? This works quite well, particularly with TTL flashes. Of course you can set up all manner of lighting using remote flashes... Check out "The Hotshoe Diaries". Great techniques once you get past the writing style. Often - the first flash that goes off is basically, the announcement that "your picture may be taken, so be on your best behaviour"... thus completely killing all mood and atmosphere. So what are we left with? Available light.
I recall when I first encountered the concept of pushing a TRI-MAX film to 800 ISO (it was ASA in those days), and with the f/2.8 lens I used… thinking, “bring it on – give me any lighting condition!”. Not that easy with digital cameras that come with zoom lenses that simply don’t have that aperture available. Sure – you can push ISO levels quite high and with the newer cameras, without the noise too, but still, those f/3.5 lenses… just not quite there. I recently purchased a 50mm f/1.8 lens for my Canon 40D for a pretty respectable price. It’s not a zoom, but in the TRI-MAX days, I didn’t have a zoom either. This lens seems to work in many lighting conditions. Moreover – it’s small and it makes the camera seem much less invasive than those big zooms. “Bring it on!” Well, at least until it's too dark for the autofocus to have a chance...
Next - I suppose you need to figure out (if blurred shots are your problem) if the blur you see in your capture is from the subject, or is it camera shake? Many modern cameras have image stabilization built into them. This helps to reduce the effects of camera shake to a certain extent. Holding the camera firmly, bracing yourself, the proper stance, squeeze the shutter button gently - all of these play a factor in sharpness. We will post a segment on this later. Suffice it to say for now - that you need to stop camera shake - this is something that CAN be controlled.
The big question is – what you wish to capture. The next question is – what is it you want a viewer to feel when they look at your picture? Will they look at the photo and see an image, or will they be transported to the scene at the time the picture was made. Will they get it?
Rules of Thumb:
|
Rule of Thumb:
outside in bright sunlight: at f/16, use shutter speed of 1/ISO |
Rule of Thumb:
The palm of your hand always reflects the equivalent of 1 stop brighter than a grey-card does - so in a pinch, meter off the palm of your hand using your palm to fill the frame and adjust down by one stop. |
|
Rule of Thumb:
for fireworks: use a tripod, f/8 or f/11, ISO 200, exposures from 1/60th to 30s (using a cable release). Focus on infinity. |
Rule of Thumb:
for photos outdoors in the winter, in order for the snow to not be a dull grey (18% grey as per the camera's metering system), use a +/- setting of +2. That is, overexpose the scene by up to 2-3 stops (thus telling the camera it is a light scene, not a dull grey scene). |
|
Rule of Thumb:
Use a tripod for the sharpest shots. But, for hand holding, the general rule of thumb is to use a shutter speed equal to one over the focal length. This means - for a 100mm lens, use 1/100th second. For 400mm, use 1/400th second. |